This is the first in a series of posts team Observian will be publishing on AWS Cloudformation. As the name suggests, this is a basic introductory article on Cloudformation. A paint brush is what I would compare Cloudformation to, AWS platform is my canvas and offerings like EC2, S3, VPC, ELB etc. are my colors to paint those elegant paintings called stacks of resources. Now, what are the building blocks of Cloudformation? Well, there are 3, namely, template, stack & change set. Template is considered the user's playground and the heart of Cloudformation.
Cloudformation Elements
Template is simply a JSON or YAML formatted file which Cloudformation uses as a blueprint to build AWS resources. It is the declaration of AWS resources that make up a stack. For this blog, we will stick with YAML in all the examples.
Stack is a collection of resources that Cloudformation will build using the template provided by the user. You create, update and delete a collection of resources by creating, updating and deleting stacks.
Changeset is a user proposed set of changes to the running resources in Cloudformation stacks. Users get to see how the change set will impact running resources before implementing it.
Template Anatomy
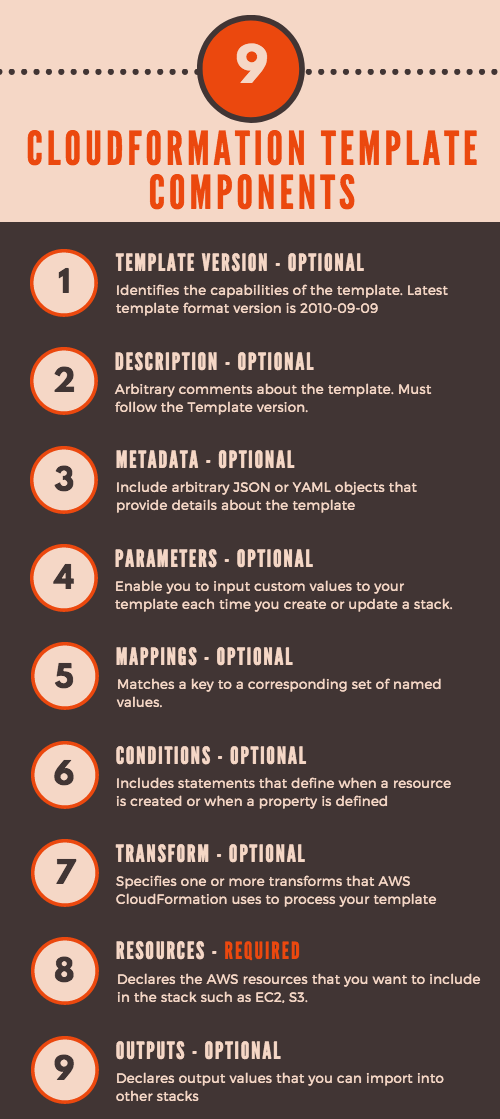
There are 9 components of a template which will help user build a stack. The easiest way to learn AWS Cloudformation is to know how each of these components gel within a template to create the final stack. Of these 9, only 'Resources' is the required component for obvious reasons that you cannot have a template which does not build any resources.
To get you an overall idea of how a Cloudformation template works, I think it is best to walk through an example and learn things on the roll.
Example Walkthrough
For this walkthrough, we build a VPC with a public subnet. We will then add an apache web server on EC2 in the public subnet. The objective of this introductory article is to get you up to the speed with the basic functionality of how cloudformation works and dive deep into it in future articles. There will be numerous walkthroughs coming up in this space to provide you with deep insights into the specifics of cloudformation.
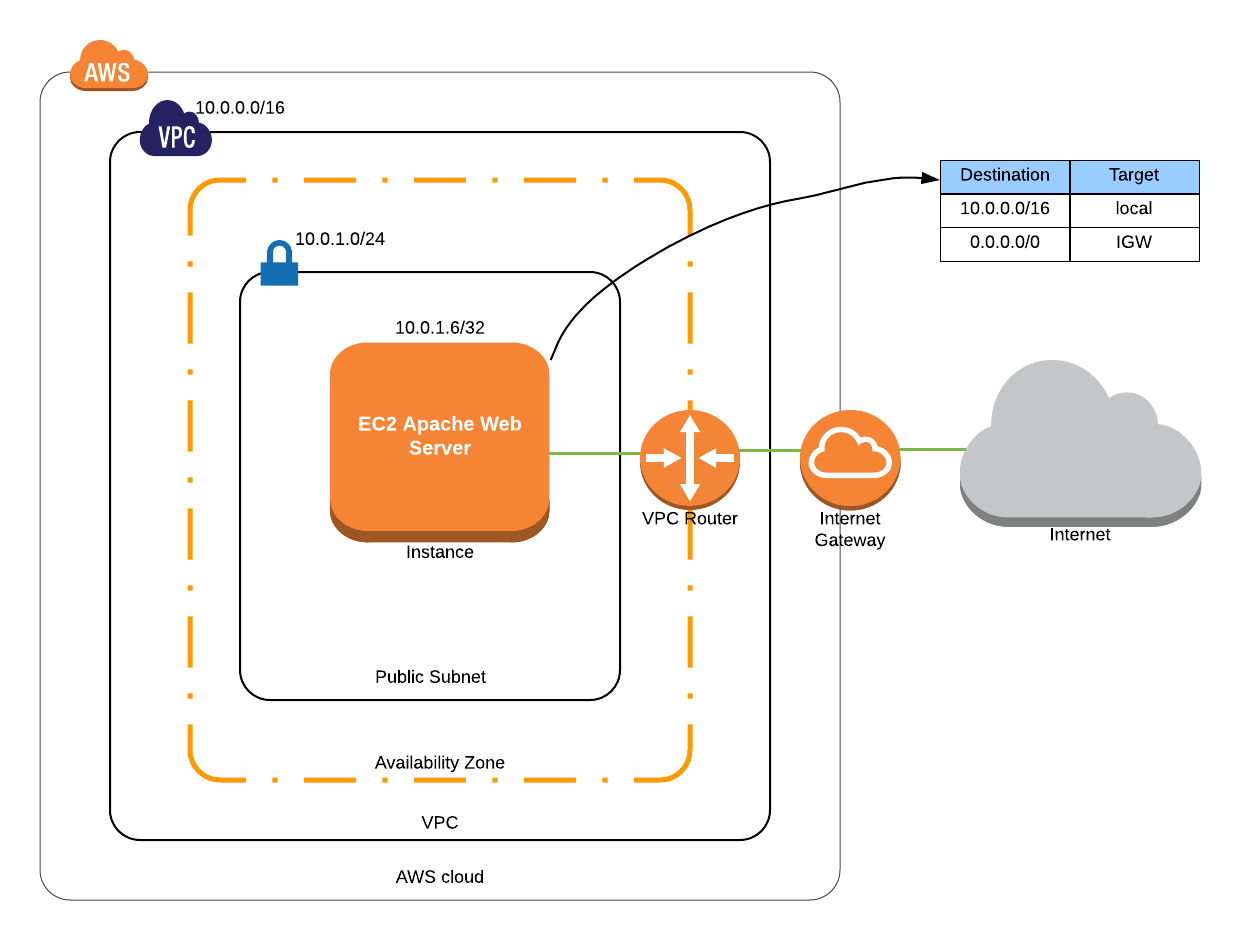
The configuration for this scenario includes the following:
- A virtual private cloud (VPC) with a size /16 IPv4 CIDR block (10.0.0.0/16). This provides 65,536 private IPv4 addresses
- A public subnet with a size /24 IPv4 CIDR block (10.0.1.0/24). This provides 256 private IPv4 addresses
- An internet gateway. This connects the VPC to internet and other AWS services
- A VPC router which helps in routing traffic between VPC subnets and internet gateway.
- An EC2 instance with a private IPv4 address in the range of subnet which enables the instance to communicate with other instances in the VPC. In this particular scenario there are no other instances involved. The EC2 instance also has an elastic IPv4 address which is a public IPv4 address that enables the instance to be reached from the internet.
- A custom route table associated with the subnet. The route table entries enable instances in the subnet to use IPv4 to communicate with other instances in the VPC and also communicate directly over the internet. A subnet associated with a route table that has a route to the internet gateway is a public subnet which is the case in this scenario.
We are not trying to build anything complex here. It is just an EC2 instance which has an apache web server installed on it. But, the concepts of VPC, subnet, route table, private and public IPs give you an idea of flow of traffic within a deployment on AWS.
Prerequisites
- You will need an AWS free tier account to create cloudformation stacks. sign up for the AWS free tier account here. The resources that you create as part of this walkthrough will not incur any costs on your AWS account.
- An AWS EC2 key-pair. The use of some AWS CloudFormation resources and templates will require you to specify an Amazon EC2 key pair for authentication, such as when you are configuring SSH access to your instances. click here for more information on AWS EC2 Key Pairs. Create a key pair if you do not have one already and save the name of the kay pair
Now that we know what components make up for a cloudformation template, let us dive deep into each component of cloudformation for this scenario.
Format Version:
The AWSTemplateFormatVersion section (optional) identifies the capabilities of the template. The latest template format version is 2010-09-09 and is currently the only valid value.
AWSTemplateFormatVersion: '2010-09-09'
Description:
The Description section (optional) enables you to include arbitrary comments about your template. The Description must follow the AWSTemplateFormatVersion section.
Description: apache web server in the public subnet of custom VPC
Parameters:
Parameters allow Template portability. Each user could input different permissible values into specify parameters section of the interface to build a stack according to their requirements. Now, we also have another set of parameters called pseudo parameters which are predefined by AWS. You could just use them in the same way as parameters. For example, AccountID is a pseudo parameter. Click here for more on pseudo parameters and here for more on parameters.
Parameters:
  VpcName:
    Description: "Enter name of VPC"
    Type: String
  VpcCidr:
    Description: "Enter CIDR block for VPC.  Ex. 10.0.0.0/16"
    Type: String
    Default: 10.0.0.0/16
    AllowedPattern: (\d{1,3})\.(\d{1,3})\.(\d{1,3})\.(\d{1,3})/(\d{1,2})
    ConstraintDescription: must be a valid IP CIDR range of the form x.x.x.x/x.
  AZ:
    Description: "Choose the Availability zone"
    Type: AWS::EC2::AvailabilityZone::Name
  PubSubnetCidr:
    Description: "Enter CIDR Block for Subnet.  Ex. 10.0.1.0/24"
    Type: String
    AllowedPattern: (\d{1,3})\.(\d{1,3})\.(\d{1,3})\.(\d{1,3})/(\d{1,2})
    ConstraintDescription: must be a valid IP CIDR range of the form x.x.x.x/x.
  KeyName:
    Description: "Key Pair name"
    Type: AWS::EC2::KeyPair::KeyName
We will be using the 5 parameters mentioned in the above code snippet.
- VpcName: takes the name of the custom VPC you want to create using this template
- VpcCidr: When you create a VPC, you must specify a range of IPv4 addresses for the VPC in the form of a Classless Inter-Domain Routing (CIDR) block; for example, 10.0.0.0/16. This is the primary CIDR block for your VPC. For more information on vpc CIDR, click here
- AZ: lists all the availability zones in the current region this template is being deployed in. User could select an AZ of his/her choice
- PubSubnetCidr: Just like a VPC, the subnet will also need a CIDR block of its own to be created; for example, 10.0.1.0/24
- KeyName: KeyName takes the key pair name used to connect to the EC2 instance this template will build
Mappings:
Like any other use case, mappings help us map key value pairs which could be referenced in future based on the need. For example, you could map region specific values with region name as key and the set of values specific to that region as value set. In this scenario, we will be mapping AMI-IDs of AmazonLinux instances to region values as we all know AMI-IDs are specific to a region.
Mappings:
  RegionAMIMap:
    us-east-1:
      AmazonLinux: ami-1853ac65
    us-east-2:
      AmazonLinux: ami-25615740
    us-west-1:
      AmazonLinux: ami-bf5540df
    us-west-2:
      AmazonLinux: ami-d874e0a0
    ap-south-1:
      AmazonLinux: ami-7c87d913
    ap-northeast-1:
      AmazonLinux: ami-a77c30c1
    ap-northeast-2:
      AmazonLinux: ami-5e1ab730
    ap-southeast-1:
      AmazonLinux: ami-e2adf99e
    ap-southeast-2:
      AmazonLinux: ami-43874721
    ca-central-1:
      AmazonLinux: ami-5b55d23f
    eu-central-1:
      AmazonLinux: ami-ac442ac3
    eu-west-1:
      AmazonLinux: ami-3bfab942
    eu-west-2:
      AmazonLinux: ami-dff017b8
    eu-west-3:
      AmazonLinux: ami-4f55e332
    sa-east-1:
      AmazonLinux: ami-5339733f
RegionAMIMap is the name of the mapping we created and each region is a key in this mapping. for each key, we have a value set, mapping the type of AMI to its AMI-ID. Now, each region could have many different types of AMIs; for example ubuntu, redhat etc. if we wanted to use different type of AMIs in each region, all it takes is to add those new value sets to the keys in the mapping. For this example however, we will be using only the AmazonLinux AMIs.
Resources:
As already mentioned, resources is the only required component of any cloudformation template.
MyVPC
The snippet below creates a custom VPC. Click here for the syntax of VPC creation
MyVPC:
  Description: Name of new VPC
  Type: AWS::EC2::VPC
  Properties:
    CidrBlock: !Ref VpcCidr
    EnableDnsSupport: 'true'
    EnableDnsHostnames: 'true'
    Tags:
      - Key: Name
        Value: !Ref VpcName
- 'MyVPC' is the logical resource-ID we give for easy reference. It could be any name.
- Description is just an expanded explanation of the resource.
- Type specifies the type of AWS resource this code is building.
- Properties are the special attributes that qualify an AWS resource to the required setting
- The value for CidrBlock is referenced to a parameter named VpcCidr. This is done using intrinsic function !Ref. The intrinsic function
Refreturns the value of the specified parameter or resource. click here for more information on how to use different functions within cloudformation
PubSubnet
Now that the VPC is created, we will direct cloudformation to create a public subnet as per the configuration.
PubSubnet:
  Description: Public Subnet
  Type: AWS::EC2::Subnet
  Properties:
    CidrBlock: !Ref PubSubnetCidr
    AvailabilityZone: !Ref AZ
    MapPublicIpOnLaunch: true
    VpcId: !Ref MyVPC
    Tags:
      - Key: Name
        Value: !Join
        - '_'
        - - !Ref MyVPC
          - "Public_Subnet"
- The CidrBlock property now takes reference from PubSubnetCidr parameter keyed in by the user and so does the AvailabilityZone.
- MapPublicIpOnLaunch Indicates whether instances that are launched in this subnet receive a public IP address. By default, the value is
false. We will turn this on because we need a public IP for the EC2 instance we are about to spin up. - Intrinsic function 'Join' is used to create a tag value for the key for the subnet being created. Click here for more information on different functions within cloudformation
PubRoute:
It is the association of a subnet with the route table that determines for that subnet to be public or private. We will now create a route table in the VPC we just created and tag it.
PubRoute:
  Type: AWS::EC2::RouteTable
  Properties:
    VpcId: !Ref MyVPC
    Tags:
      - Key: Name
        Value: Public Route Table
PubSubnetAssociation:
This associates the subnet to the route table created in the above step. As mentioned earlier, It is this association that determines the subnet to be public/private depending on the routes that we are yet to define within the route table.
PubSubnetAssociation:
  Type: AWS::EC2::SubnetRouteTableAssociation
  Properties:
    SubnetId: !Ref PubSubnet
    RouteTableId: !Ref PubRoute
IGW, AttachGateway & DefaultRoute:
We will now create an Internet gateway, attach it to the VPC we created and then define a default route for it.
IGW:
  Type: AWS::EC2::InternetGateway
AttachGateway:
  Type: AWS::EC2::VPCGatewayAttachment
  Properties:
    VpcId: !Ref MyVPC
    InternetGatewayId: !Ref IGW
DefaultRoute:
  Type: AWS::EC2::Route
  Properties:
    RouteTableId: !Ref PubRoute
    DestinationCidrBlock: 0.0.0.0/0
GatewayId: !Ref IGW- IGW is the logical resource ID of the internet gateway this code snippet creates.
- The AttachGateway part attaches the internet gateway to our custom VPC "MyVPC".
- DefaultRoute maps the route between the route table and the destination CIDR block through the Gateway specified. In this case it is an internet gateway.
SecurityGroup:
We now have all the setup to spin up the EC2 instance. Before we spin up one, we need to ensure that the corresponding security groups are in place for the EC2 instance. In this scenario, we need 1 security group to allow SSH and HTTP as specified below. SSH for you to SSH into the instance just in case and HTTP to allow web traffic for the apache web server.
SecurityGroup:
  Type: AWS::EC2::SecurityGroup
  DependsOn: 'MyVPC'
  Properties:
    GroupDescription: allow ssh and http
    VpcId: !Ref MyVPC
    SecurityGroupIngress:
    -
      CidrIp: 0.0.0.0/0
      FromPort: 22
      IpProtocol: 'tcp'
      ToPort: 22
    -
      CidrIp: 0.0.0.0/0
      FromPort: 80
      IpProtocol: 'tcp'
ToPort: 80- This SecurityGroup depends on 'MyVPC' because, to create a security group, we need to provide it with the name of the VPC it is being created in. The DependsOn will ensure that the creation of security group is on hold until the custom VPC is created. It makes sense because the logical ID of VPC is required for the security group to be created which will not be available unless VPC is created successfully.
EC2Instance:
This EC2 instance spins up with a pre configured apache web server as configured by the "UserData" property of the code snippet below.
EC2Instance:
  Type: AWS::EC2::Instance
  Properties:
    ImageId: !FindInMap [RegionAMIMap, !Ref 'AWS::Region', AmazonLinux]
    InstanceType: t2.micro
    SubnetId: !Ref PubSubnet
    Tags:
    - Key: Name
      Value: apache_web_server
    UserData:
      'Fn::Base64':
        !Sub |
          #!/bin/bash
          yum update -y
          yum install -y httpd
          chkconfig httpd on
          service httpd start
          echo "Success! Welcome to the world of Cloudformation" > /var/www/html/index.html
    KeyName: !Ref KeyName
    SecurityGroupIds:
- !Ref SecurityGroup- The FindInMap intrinsic function is used to fetch the corresponding ImageId from the RegionAMIMap mapping. Click here for more information on syntax and specifics of intrinsic functions.
- InstanceType, SubnetId and Tags are self explanatory.
- UserData allows us to key in any bootstrapping scripts for the EC2 instance. In this case, we are using UserData to install and configure apache web server on the EC2 instance.
- KeyName takes the value of the EC2 key pair that was mentioned in the pre requisites for this walkthrough. The KeyName is one of the parameters keyed in by the user.
- SecurityGroupIds have the list of Security groups that are to be associated with this EC2 instance. In this scenario it is the one we created above.
This marks the end of resources section of this cloudformation template.
Outputs:
Outputs section declares output values you could use to import into other stacks, return in response or just view on the cloudformation console. In this scenario we just declare URL to access the web server home page as an output.
Outputs:
  WebServerURL:
    Value: !Join ["", ["http://", !GetAtt EC2Instance.PublicDnsName, ":80"]]
Description: URL for the apache web server- The Join Intrinsic function joins the strings supplied to it using the specified delimiter. in this case we just need to concatenate all the strings without any spaces so we use "" as the delimiter to form the URL to access the home page of the web server.
- GetAtt is another intrinsic function being used here to fetch the value of Public DNS Name of the EC2 Instance.
Stack creation on the AWS account
We will now walkthrough the process of creating a cloudformation stack on the AWS account. The code needed for this is on observian/blog public git repo. You could clone or download the repo and look for cloudformation_101_blog.yaml file. This is the file we will upload to S3 to create the stack.
- login to the AWS Management Console, click on 'Services' on the top left and select 'CloudFormation' in the Management Tools section.
- Click on 'Create new stack' button
- Under Choose a template, opt for 'Upload a template to Amazon S3', click on 'choose file' button and browse for the 'cloudformation_101_blog.yaml' in your cloned/downloaded git repo on your computer. Then click 'Next' button
- You will now land at the specify details section.
- Give an arbitrary Stack name of your choice. This is used to uniquely identify this stack in this particular region on your account. So, ensure that the name does not clash with any pre existing stacks in the same region on your account.
- select an availability zone of your choice from the AZ drop down.
- select the Keypair that you created/already had from the drop down
- for the PubSubnetCidr, key in 10.0.1.0/24 for now.
- leave the default value of VpcCidr, i.e. 10.0.0.0/16
- enter the name of the custom VPC you want to build for the VpcName.
- Right now, I know you do not like the order in which parameters appear here and there is a solution for this using ParameterGroup property of the AWS::CloudFormation::Interface. I will ensure this is addressed in the next example walkthrough.
- click 'Next' button.
- leave options section as is and click 'Next' button again
- Review the details of the stack you are about to create and click 'Create' button.
- wait for the status of the stack to turn 'CREATE_COMPLETE'. Once it gets there, select the stack you just created and click on the outputs tab. You will find the web server URL looking like 'http://ec2-52-205-120-226.compute-1.amazonaws.com:80'. click on that link in the outputs tab and you will be able to access the home page of the web server saying 'Success! welcome to the world of cloudformation'.
Stack deletion:
The resources we created using the above walkthrough are in the free tier and should not incur you any costs. To ensure that you are not charged with any recurring costs just in case, it is always a best practice to delete the resources we create if we do not intend them to stay along.
To delete the stack, just select the stack you just created, click on the 'Actions' button and select 'Delete Stack' from the drop down.
This wraps up the detailed introduction to cloudformation with a simple example walkthrough.